Kiam on EKS with Helm
A guide to configuring Kiam for an EKS cluster, deployed using CloudFormation and Helm
Posted by Harry Lascelles on June 14, 2019
Update 2020-01-25
This blog post describes a technique that has now been deprecated in favour of native EKS pod authorisation using IAM backed service accounts.
See our new blog post for details on how to set that up using just a CloudFormation template: Configuring EKS for IAM (OIDC) using CloudFormation
Original blog post
Applying IAM roles to pods in a running Kubernetes cluster has always been a tricky problem. The good people at uswitch have created Kiam, which can ensure that your pods run with only the permissions they need.
This blog post comes with a single command script that will deploy you a working implementation of kiam. You can then apply what you've learnt to your own clusters.
How kiam works
Before we get started down the kiam road, it is important to understand the concepts behind it. This is a high level overview, and you should read their documentation to fully understand it before putting it into production.
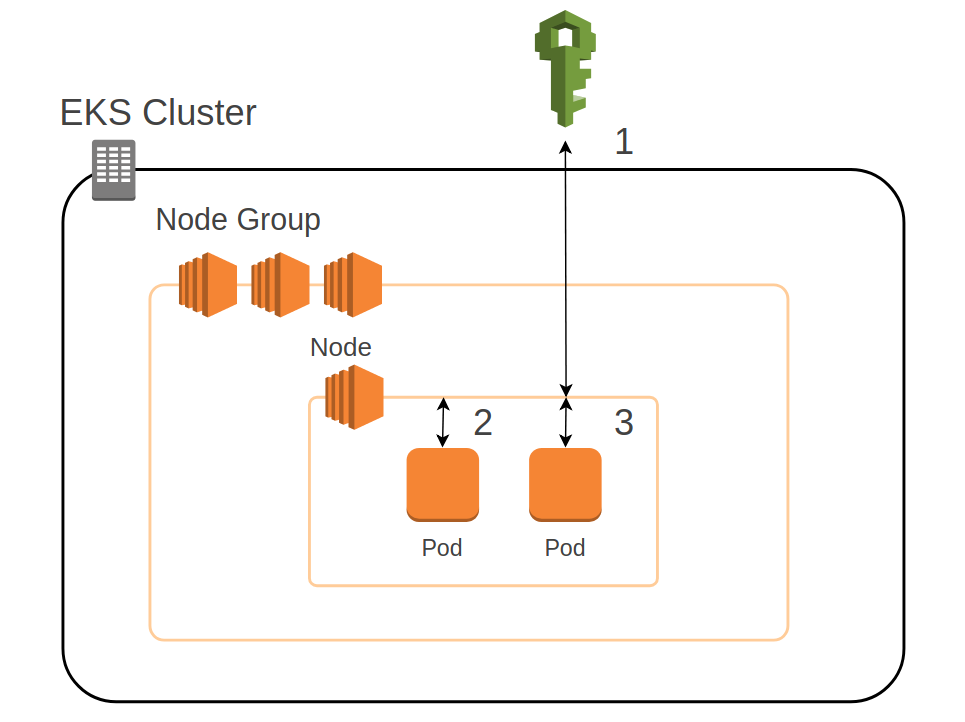
The diagram below shows how an EC2 instance in an EKS cluster delegates permissions to pods without kiam.

EKS pod authentication without Kiam
- When a node is first provisioned, it requests credentials from IAM based on its instance profile. These credentials are then refreshed periodically for the lifetime of the EC2 instance.
- A pod running in a Kubernetes cluster is just a process on an EC2 instance, so when it asks for credentials, the call is immediately handled by the metadata service of the node.
- The same is true for all pods on the node, so they will therefore receive the same credentials and will be running with an identical (possibly a superset) of all possible business logic permissions. This is a Bad Thing.
Tools like kiam and kube2iam work by intercepting the metadata service credentials lookup with a proxy service, assuming the requested role, obtaining the credentials, and passing them back to the pod. Thus individual pods on the same EC2 instance can have different roles. These credentials look just like the classic AccessKey and SecretKey you are familiar with, except that they are timebound, and must be refreshed periodically.
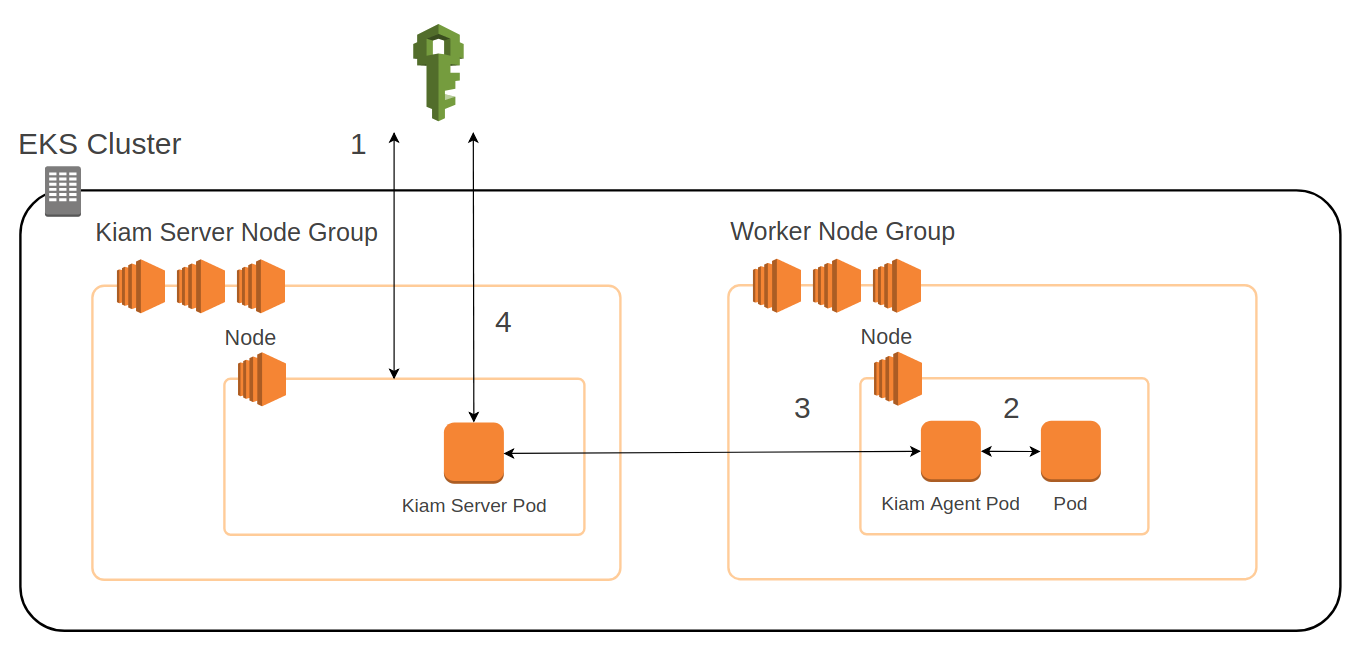
Since these proxies must be able to assume all possible pod roles, kiam prefers the fail-safe methodology of splitting the proxy into two services. The interceptor is the kiam-agent, which runs on the same nodes as the worker pods. The credentials requestor is the the kiam-server, which runs on different EC2 instances to the main worker nodes.

EKS pod authentication with Kiam
- The kiam-server node starts, and obtains credentials for its instance profile. This includes the ability to assume any role the business logic pods need.
- The business logic pod requests credentials from the node metadata service. The call is intercepted by the kiam-agent.
- The kiam-agent sends a request to the kiam-server.
- The kiam-server obtains credentials from IAM and passes them back along the chain to the business logic pod.
It may seem unusual to see one Kubernetes cluster running two worker node groups, but this is a perfectly valid scenario. It is sometimes used to run specialist nodes, for example those with GPUs, in a separate group to more "general" nodes. In our case, it is necessary to ensure that the nodes running the business logic pods have no IAM permissions beyond that required to join the cluster.
Prerequisites
This guide assumes familiarity with EKS and helm. All the required components are provisioned using CloudFormation, so a working knowledge of that would help. You can see our previous post on how to set up your EKS cluster using CloudFormation.
What's going to happen?
This example creates everything from the VPC and EKS to the helm install of kiam. The repository can be found here: https://github.com/bambooengineering/example-eks-helm-kiam
In the repository there is a single script that will:
- Use CloudFormation to create a VPC, an EKS cluster, a worker node autoscaling group, and a kiam-server node autoscaling group.
- Use CloudFormation to create an example SNS topic, and an example role that allows describing that topic. We can use this later to prove kiam is working.
- Configure the cluster for the new nodes
- Apply a kiam-secrets chart to automatically generate the required TLS certificates.
- Apply the kiam helm chart
- Apply the simple proof of concept Deployment
The resulting cluster will be minimal working example of Kiam on EKS using CloudFormation.
Deploying the example
All set? Let's go.
# Clone the repository
git clone git@github.com:bambooengineering/example-eks-helm-kiam.git
cd example-eks-helm-kiam

# Set the region for your cluster and the existing AWS SSH key you wish to use
export AWS_DEFAULT_REGION="eu-west-1"
export KEY_NAME=some-key

# Run the script. It will take about 15 minutes.
./setup.sh
That's it.
What is this script actually doing?
Installing kiam is not as simple as just applying one helm chart. Some additional configuration is required to make everything play well together. The script performs a number of tasks:
-
The stack is created with
aws cloudformation create-stack. This creates the VPC, EKS, new nodes and roles, and the example SNS to prove our system is working. It also creates a Security Group ingress for the kiam-server node group to be accessed by the main worker node group on port 443. This permits the kiam-agent to talk to the kiam-server.It is worth examining here the specific config in the
KiamServerNodeLaunchConfigfrom the CloudFormation template.We want kiam-server pods to run just on the second (kiam-server) node group, and also prevent any other pods from being scheduled on them. The reason for this is that the kiam-server nodes have the "assume any role" permission, which we want to reserve for the kiam-server pods.
These goals are achieved by using a node-label and a taint respectively.
Here is the bootstrap command for the nodes as specified in our CloudFormation template.
/etc/eks/bootstrap.sh ${EKSClusterName} ${BootstrapArguments} \
   --kubelet-extra-args '--node-labels=kiam-server=true --register-with-taints=kiam-server=false:NoExecute'
Let's look at the
kubelet-extra-argsvalue settings:--node-labels=kiam-server=true- When pods are scheduled, you can give them an affinity that means they can only be scheduled on nodes with a specific label. Here we label these nodes withkiam-server=true. We can provide the same name in the kiam helm chartvalues.yamlso that the kiam-server pods know where to run.--register-with-taints=kiam-server=false:NoExecute- This taints the new nodes so that by default no pods can run on it. The only way a pod can be scheduled on this node is if it has a toleration that matches the label. This toleration is configured in thevalues.yamlfile.
-
To ensure we can connect to the cluster, the configuration is downloaded from AWS using
aws eks update-kubeconfig. Without this, ourkubectlcommands would not know what to connect to. -
Next up, it configures the EKS
aws-authConfigMap to allow both node groups to join the cluster -
It waits for the new nodes to join the cluster with a
until kubectl get nodes ... -
A
kiam-secretschart is released. This automatically generates the required mutual TLS certificates for kiam. -
It is finally time to apply the kiam helm chart with
helm upgrade --install. This is where the helmvalues.yamlfile is used. The two important parts of that file to notice are thetolerationsthat allow the kiam-server pods to run on the new nodes, and thenodeSelectorthat prevents them from running on other nodes. Thekiam-agentpods by default are allowed to run anywhere, but you can constrain them with anodeSelector. -
The cluster now has a full working Kiam installation. The rest of the script creates an example namespace and simple pod running ubuntu with aws cli installed. We can use it to demonstrate that kiam is working.
There is one crucial piece of configuration here. Individual pods can declare which roles they want to assume, but they cannot declare anything that the namespace doesn't allow. To constrain them, the namespace must provide a
iam.amazonaws.com/permittedannotation.This can be found in the
templates/example-namespace.yamlfile. It is critical this matches the roles that the pods request, or the request will be denied. Note, the value is a regex. It is not anAssumeRoleresource, so the asterisk is not simply a wildcard. There must be a period in front of the asterisk. By default the arn can be the short version without the long "arn:..." prefix containing the AWS account etc.annotations: iam.amazonaws.com/permitted: example-kiam-cluster-pod-role-.* -
Finally the script deploys the example business logic chart
example-business-logic. This just contains a Deployment.The pod spec specifies its required pod role as an annotation:
annotations:
  iam.amazonaws.com/role: example-kiam-cluster-pod-role-somesuffix
The proof of the pudding
We can now prove Kiam is configured correctly by running commands from inside the example business logic pod, and check that it has the roles expected of it.
-
Show the agent and server are running
kubectl --namespace=kube-system get pods -l "app=kiam,release=kiam"You should see both the agent and server running. Note, it can take a minute for them to settle, so if they are in CrashLoopBackoff, wait and try again.
-
Open a shell on the business logic container.
POD=$(kubectl get pod -l app=business-logic-deployment -o jsonpath="{.items[0].metadata.name}" --namespace example) kubectl exec -ti $POD --namespace example -- /bin/bash -
Now demonstrate to yourself that the pods on the worker nodes only have a very specific subset of IAM permissions.
export AWS_DEFAULT_REGION=eu-west-1
ACCOUNT_ID=$(aws sts get-caller-identity --query Account --output text)

# Prove that we are running this pod under the assumed role. You should see something akin to
# "arn:aws:sts::900000000000:assumed-role/example-kiam-cluster-pod-role-somesuffix/kiam-kiam"
aws sts get-caller-identity

# This command will succeed
aws sns get-topic-attributes --topic-arn arn:aws:sns:eu-west-1:$ACCOUNT_ID:example-kiam-cluster-example-topic

# This command will fail with "not authorized to perform: SNS:ListTopics" since the assumed
# role does not have the ListTopics permission.
aws sns list-topics
We're a long way from Kansas
By now you should have a fully functioning cluster with kiam configured and authorising your pods. You can now apply what you've learnt to your own cluster.
Note, though, configuring kiam is not trivial, and the smallest misalignment of settings can lead to pods being unable to assume any roles at all.
There are other ways to configure kiam, but with this method (using two node groups), some key points to remember are:
- The kiam-server worker nodes should be tainted to prevent other pods from running on them
- The kiam-server worker nodes should be labeled to ensure the kiam-server pods only run on them
- There must be a Security Group that allows the worker nodes to connect to the kiam-server worker nodes on port 443
- The TLS serverCert hostname must match the Service of the kiam-server.
- The kiam-server worker nodes should have a role that allows AssumeRole with a wildcard role (non-regex)
- The business logic namespace should declare the roles it allows as an annotation (regex)
- The business logic pods should declare the role they require as an annotation
A note on certificates
The script in the repo that accompanies this post generates the kiam secrets on the fly using the kiam-secrets chart (also in the repo). If you change the release of that chart, those secrets will be rotated, and you will have to restart all your kiam-agent and kiam-server pods.
To avoid this, you can generate your secrets in advance, or use a tool like cert-manager. The
kiam documentation has some guidance on doing this.
Next steps
Once you've successfully authorised your pods, you can move onto the next steps in producing a production-grade Kubernetes cluster, such as improving helm security. This example uses a bare-bones helm install. You should follow helm's best practices to secure your installation.
That's it... Good luck on your Kubernetes journey!